Thursday, October 17, 2013

Sprinkles cupcakes

Checked another thing off my "26 before 26" list...having a Sprinkles cupcake.


Sprinkles cupcakes was the first cupcake bakery. It opened in Beverly Hills in 2005 and pretty much started the whole cupcake craze. I've read so many raving reviews and blog posts about their cupcakes (specifically the red velvet)! So when I saw there was a store just a 15 minute drive from our apartment, I knew I had to go.


There were no tables available when we got there, so we decided to get our treats to go and have them for dessert later. We each got a caramel apple, and Ryan got a red velvet and I got a banana chocolate.


And while I hate to say this...I wasn't super impressed. The cupcakes are beautiful, don't get me wrong. And of course they are good, they're cupcakes for crying out loud! But after my first bite or two, I was kinda just like, "Eh. I could make this." There was nothing super special about it.  Sorry, Sprinkles.

Now Magnolia Bakery's Devil's Food Cake cupcake...that puppy is good. That cupcake is to die for! That little guy might convince me to one day live in NYC (Oh geez. I take that back. I'm done with the East Coast. Buuuuut I sometimes do find myself dreaming about living in the Big City one day. And if you recall, NYC was like a beautiful little retreat from Philly for us. Wait! No! I take that back too!)

Monday, October 14, 2013

365: Week 4

Well, I've had my camera for a month and tomorrow I will have successfully completed my first month of this 365 project! I can see my skills improving and have already gotten so comfortable with my camera. I've figured out lots of little "shortcuts" so to speak, so it's getting really easy for me to adjust all the settings a bit more quickly and in the moment.

It's also not at all a challenge for me. I'm LOVING toting my camera around and taking tons of pictures. It's like I see the world differently when I have a camera along for the ride. I look at everything with a bit of a more careful eye. I really take in my surroundings. In one of my favorite books, Instant Love, they talk about seeing the world in squares. That is, looking at everything as if it were a polaroid image...or a potential image rather. How would you shoot it, how would you compose it, etc. I guess that's how I mostly look at the world...how would that look as a picture? Would I want to take it with my DSLR, my Dianes or my SX-70? How's the lighting? What if I look at it from this angle? Would I move anything around and change the composition at all, or do I like the organic feel of where everything lies naturally? These questions are always kind of bouncing around in my head. And I guess I'm just now realizing that's kind of strange, and can't at all be normal. But I'm okay with that. I've found a hobby to love!

I've decided I don't really like sharing my pictures from everyday. Some days I just don't really like the pictures that I take, and while I can grow in that and appreciate the not as good pictures for the learning tool that they are, I really only want to be sharing the pictures that I love. So like I said, how this project effects my blog will change through out the year until I get in a groove that I like, and I guess here's the first change. Nothing major, just going to be sharing pictures that I love. Some weeks I may share from all 7 days, some weeks I may only have 1 photo.
Here are my favorites from this past week:

Day 26, 10/9
A gloomy day in San Diego is a very rare thing! It was...heavenly. Haha. I got to WEAR LAYERS to work. LAYERS!

Day 26, 10/9 (Again)
What is this?!


And a few from a little photo shoot I did with Drake. Which of course are mostly showing up blurry or grainy on here, because they are favorites of mine and blogger likes to stick it to me like that. Anyways, Drake loves to sleep in our bed. And we, of course, hate him sleeping in our bed because he has dark fur and we have white sheets...and eww. So as I was preparing to strip the bed to wash the sheets, and I saw the beautiful late morning light coming in our window...I saw the perfect opportunity to spoil the little Bubs and get some good pictures of him in the process.
Day 28, 10/11
 
Day 28, 10/11

Day 28, 10/11

Day 28, 10/11

Friday, October 11, 2013

makin' cronuts

I made some cronuts again! Just as before, they were delish! This time I made a salted caramel one and a lemon one, because I know how much my mom loves lemon stuff and we're planning on making these during our Thanksgiving trip to visit them, so I wanted to see how it would taste. Ryan and I both agreed the lemon was a win. (So you're in luck, Mom!)


I decided these are just too good to not share with the world...or the 10 family members and friends who read this ;) So today you all are getting a recipe post!
I found the recipe through whiskey tango foxtrot and knew I had to try it! They are pretty easy to make, but it takes a bit of time. So if you're gonna tackle them don't expect to be eating in 10 minutes.
You can find the recipe here, or follow along below. My version is slightly tweaked from the Pillsbury recipe, but it's the same general idea. (Also, the Pillsbury recipe says to use caramel sauce and just add salt to it. And I think that's a terrible idea. So if you have a TJ's by you, buy the Fleur de Sel Caramel Sauce and try to not eat the entire jar with a spoon before making these. If you don't have a TJ's by you, I say make your own! It's super easy and tastes AMAZING! I'll include the recipe for that below as well)

Salted Caramel (or whatever flavor you want, really) Cronuts 
Ingredients
-1 can of crescent rolls (you'll get 2 cronuts from 1 can)
-1 snack size vanilla pudding
-Vegetable oil, you'll need enough to almost cover an uncooked cronut, so the amount will vary depending on the size of your pan
- 1/2 cup powdered sugar
-Milk (only a tablespoon or 2)
-Caramel sauce
-Course salt (optional)

Directions
1. The crescent roll dough will have "pre-cuts" for 8 triangles. Separate the dough into 4 rectangles, each rectangle made up of 2 of these triangles. Press those perforations for the triangles to seal them together so your cronuts don't fall apart. Stack 2 of the rectangles on top of each other, then fold in half to make a tall stack. Repeat with remaining 2 rectangles.

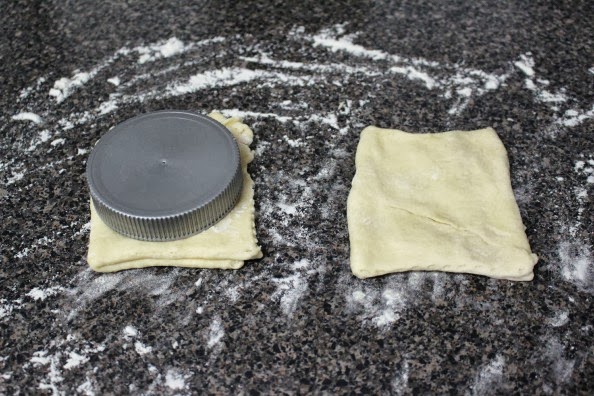
2. Using a 3-inch biscuit cutter (or any circle shaped item in your kitchen and a knife, like me), cut 1 round from each stack. Use a 1/2-inch biscuit cutter to cut out a small hole in the center of each round. The Pillsbury recipe says to reroll the remaining dough to cut a third one, but I have yet to successfully get 3 cronuts from this recipe. The third one always gives me problems at one step or another. Go ahead and try to get a third one, but it will most likely be in vain.
Biscuit cutter...lid to a huge jar of jelly beans your husband's Nana and Poppa sent you...same thing.

Oh, third cronut. You look so promising. Nice trick, liar.

3. In deep fryer or saucepan, heat oil over medium heat to 350°.

4. Fry cronuts in hot oil on each side until golden brown and cooked through (roughly anywhere from 45 seconds-1 1/2 minutes on each side. Like I said before, be sure the oil is at least a little over half-way up on the uncooked cronut to be sure they get fully cooked) Drain on paper towels. Cool for 5 minutes.


5. Split the cronuts in half and pipe some vanilla pudding onto the bottom half of each one. (I just put mine in a ziploc bag and cut the corner off for that. Or this past time, I just spooned some on. Nothing Martha-Stewart-fancy over here) Put the top halves back on :)


And we've lost the third cronut. One of these days I'm going to get 3. I'm determined.

6. Carefully roll each side of the cronuts in sugar. This is a completely optional step, I only do it because I think it makes them look prettier.

7. Make the frosting by slowly adding the milk to the 1/2 cup of powdered sugar. I'm talking like a teaspoon or less at a time. It doesn't take much for it to go from thick and gloppy to too runny. The consistency is totally up to you, so stop adding milk when you like what you see. (I added too much milk this last time and didn't feel like wasting a bunch of powdered sugar to thicken it up again so our frosting was a bit too runny for my liking)

8. Drizzle each cronut with some frosting. And then top with salted caramel sauce and add a sprinkle of course salt on top of that if you wish! Or top it with any kind of sauce you want, or none at all!


Salted Caramel Sauce
(Sorry, no photos. But it's super easy, I don't think photos are needed)

Ingredients
-1 1/2 cups sugar
-1/4 cup + 2 tbsp water
-6 tbsp salted butter
-3/4 cup heavy cream

Directions
1. In 3-quart saucepan, heat sugar and water over med-high heat. Whisking constantly to dissolve sugar.
2. Once mixture begins to boil, stop whisking. Let it boil until it is a dark amber color, carefully "swirling" the pan occassionally.
3. Once it is dark amber, immediately add butter and whisk until butter melts, then immediately remove from heat.
4. Wait 3 seconds, then carefully pour in cream and immediately whisk to combine. It will bubble like crazy, and may spatter boiling hot liquid on your hands/arms...so if you don't want little tiny burns everywhere like I got (why you wouldn't want to be just like me is beyond me) wear an oven mitt.
5. Whisk until combined and smooth. Enjoy :)
(We stored ours in a glass jar in the fridge and it lasted for the week that we were using it. Not sure how long it will actually last because it was most definitely gone before it got to that)

Enjoy! Let me know if any of you actually make them :)

Monday, October 7, 2013

365: Week 3

I think my problem with the blurry photos on here is that I am resizing them to be the proper width for my blog layout, and because the pictures are so much larger than that size they are being shrunk down quite a bit. Which is affecting the quality. But...I don't really know how to solve that because a.) while I could set my camera to take smaller sized pictures, I don't want to because if I want to make a large print of one of them I'm kind of screwed in the quality department and b.)I can't not resize them because like I said, they're huge, and they won't fit here anyways.

So...guess I'll have to live with blurry pictures on here until I find a better solution. Stupid blog.

Day 17, 9/30
Several peppers ripening at the same time in our balcony garden means our favorite
homemade pizza three days in a row: pesto, goat cheese and roasted red peppers

Day 18, 10/1
Some kids are awesome. And other kids are really awesome. This little guy is clearly the latter.

Day 19, 10/2
Isn't he super cute? Another favorite that I'm sure will remain a favorite through out
the year. You'll just have to trust me that the clear version of this one is really good.


Day 20, 10/3
Lights for Lucas

Day 21, 10/4
Hung out with this super cool dude for a few hours.

Day 22, 10/5
The beginnings of dinner. Love squash season!

Day 23, 10/6
Sunday afternoon bike ride and coffee shop mini-date

Friday, October 4, 2013

my [our] favorite place

Yay!! We finally made it to our favorite place this past weekend...Torrey Pines Beach!
Torrey Pines is a State Park along the coast just north of us. It is BEAUTIFUL! Crystal blue water, cliffs, perfect waves...how could you not love it?

Well, this picture hardly does it justice. But it was a lot more difficult than I expected to get a photo
while in a moving car, driving through bridge construction. (Shot with my point-and-shoot)

We like to pack a cooler full of snacks and drinks and sometimes a lunch and spend the afternoon there. We mostly love it because it has great waves for boogie boarding! Haha, we're like little children of the ultimate tourists, but whatever. It's super fun. Even if the water is freeeezing and we can hardly feel our legs when we're done.

No, those are not smudges on your computer. Just smudges on my lens. Darn it.


Currently playing on the record player: Still going strong with The Mamas and The Papas, always a favorite